Configuring Roles in Plone & AD
Configuring Roles in Plone & AD
Plone Roles
Each Plone role has a special set of permissions in the Plone workflow. Here are common Plone roles and what they mean:
- contributor (can add content)
- editor (can edit content by self or others)
- reader (can read content by others)
- reviewer (can edit/publish content/metadata but cannot create new content)
- manager (can access the Plone control Panel and ZMI for the Plone instance; this is essentially the Administrator role)
It also is possible to give a group access to the same web folder. Note: Before you can assign Plone roles to an AD group, you must choose an appropriate authentication profile.
For a brief introduction to Plone roles, go here http://plone.org/documentation/how-to/using-roles
Assign Roles to Users
You can assign Plone roles to users by one of two methods.
- for each Plone role, create a group (i.e., Contributor group, Editor group, etc) and then add a user to the appropriate group or groups. (This process will be described in detail below with Active Directory. The instructions are different for LDAP users and groups).
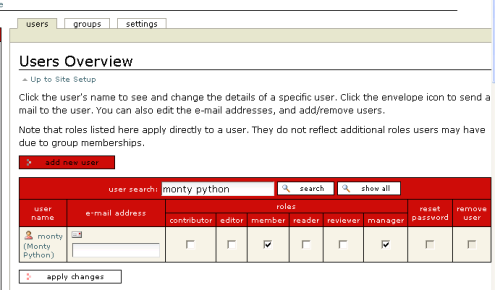
- manually add roles to users on the Plone Site Setup link for Users & Groups. (See Creating Plone groups within the Plone control panel). We now see that the user "Monty Python" has received the manager role.
The User tab shows the current active permissions. Note that merely removing a check from a user's role on the User tab does not automatically remove the permission itself if the user already received the permission as a result of a group membership (Read more about editing & removing user permissions).
Creating Groups
Groups make it easy to assign permissions uniformly without having to edit individual permissions.
There are two reasons for having groups in Plone.
- Rights to a folder. Suppose you wanted everyone in the Accounting department to have access to a folder in Plone called Accounting (or two folders, or three). Then, you could set Sharing permissions on a folder so that all members of the Accounting group would have read/write/edit rights to it. (See Setting Up Shared Web Folders).
- Global Rights. Suppose you wanted a user to be able to edit any page on the web site. Then you could create a group called Editor or Contributor, etc.
Another reason for having groups is to be able to set the default member low (i.e., without the Viewer role checked) and then add permissions to individuals by putting them into one or more groups.
For example, John could be a member of both the Editor group and the Accounting group. The Accounting group could be created specifically so group members can have shared access to a specific folder of web content. Within the Accounting folder, all members of the Accounting group would have the ability to write and edit content. In addition, because John belongs to the Editor group, he would have the ability to edit all content on the web site.
Using these two kinds of groups makes it possible to have finely tuned permissions for the website.
There are two ways to create groups.
First, someone with Manager rights (like the Zope user, for example), could go to Plone Site Setup, choose Users & Groups and click on the Group tab.
This method is recommended only if you are creating simple users from Plone Site Setup (See Creating simple users and groups without Active Directory). But that means that all your user and group data is stored in the ZODB and not in an external source (like Active Directory).
The second method is to create/modify groups in Active Directory (or for some situations LDAP) and import the data into the Plone site(s). This method is easier for enterprise deployments because it keeps user data in a centralized location and allows it to be reused by other applications. Because enterprise deployments typically use Active Directory for authentication of domain users, this is the recommended method when available.
Assigning Roles to Groups
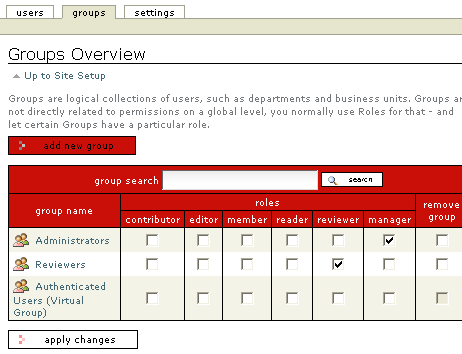
The Plone Site Setup --> Users & Groups menu lets you assign roles to a user or group.
You usually will complete this step after you have successfully configured an Authentication Profile.
After you have configured the authentication profile correctly, you can assign roles to groups by going to Plone Site Setup --> Users & Groups.
You can assign roles to Active Directory groups or to groups with simple users. See alternate scenarios for user authentication).
-
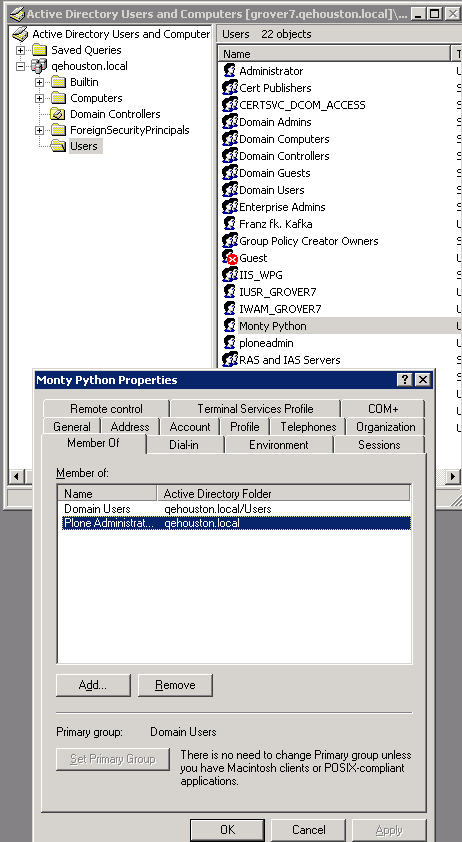
Create an AD group and add domain users to it. (Note: the Windows user must have rights to do this). In the screenshot below, a group called Plone Administrators has been created inside the domain qehouston.local and a user named Monty Python has been put inside this group.
-
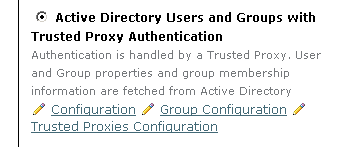
Go to Plone Site Setup on the Plone Site. Choose Authentication Profiles.
-
Confirm that the Authentication Profile you have chosen contains the phrase "and Groups".
-
In Plone Site Setup, select Users & Groups. Go to the Groups tab. You should see a listing of available groups. (If a group does not appear, you may need to search for it). If you are connected to Active Directory, you will see a listing of Active Directory groups here. Note: typically, if you are using Active Directory to manage users and groups, you will not normally add a group using this configuration menu. This menu is mainly useful for looking up permissions for users & groups and assigning permissions to users and groups. (whether they reside in Active Directory or not).

You can verify that these permissions apply to an individual member of this group by looking at the user tab. You may need to search for that user's name. We now see that the user "Monty Python" has received the manager role.
Removing a right from a user
On Plone Site Setup there is a configuration menu called Users & Groups. This configuration menu has two tabs: Users and Groups.
The Users tab lets you see (and configure) rights of individual users. The Groups tab lets you see rights assigned to a group. If Enfold Server is connected to Active Directory, you will control group membership with Active Directory. If Enfold Server is not connected to Active Directory, you will be able to configure these rights on the Groups tab.
Each right is additive, so if a group membership (such as "Accounting group") gives Vincent a certain right, that right will persist even if you manually uncheck this right for Vincent on the Users tab. Conversely, if you give a certain right to Vincent, that right will persist even if the Accounting group lacks this right. The only true way to remove a right from Vincent is to confirm that Vincent has not received the right as an individual and to confirm that no group Vincent belongs to has assigned him that right as well.
Allow AD Group to Add Content to a Folder
Once you have created groups, you can assign them special permissions. For example, all members of the Sales group can have the ability to add /modify/delete permissions for a certain web folder. See Setting Up Shared Web Folders .