Uploading & Moving Files
Files do not have workflows
When you add or edit items into Plone folders using Enfold Desktop, they are either Plone Documents or files (usually). (Read more about content types).
If you edit Plone documents with Enfold Desktop, you need to perform two steps after editing:
- Check it in (see Checking in a Plone Document).
- Change the Plone document's state (either from Private-->Publish or Private-->Submit for Publication).
This is completely differently from the default behavior for Files. By default the File content type does not have publication states (i.e., workflows). Editing (i.e., uploading) files involves a different process.
- Check it in.
Important: Publication of a File is automatic. In other words, after you upload a file, it automatically is public -- even if the containing folder is private.
Here are some other unique characteristics about Files and how they are handled in Enfold Desktop.
- The right-click menu for the file still gives you the option to view in browser. That will actually send you to a web page containing a link to the file. (It will have no other content to speak of on that page).
- By default, the Plone site will not keep different versions of this file (this contrasts with Plone documents, which allow this; read more about versioning web pages). Your system admin can change the default so that Files are versioned too. (see Enabling Versioning & Workflow for Files).
- you can still view/access the properties of a File by right-clicking it and choosing properties. However, enable comments won't apply to it.
Note It is possible for your system admin to change this default so that Files do indeed have workflows: see Enabling Versioning & Workflow for Files.
Uploading Files
Perhaps the most useful task which Enfold Desktop can perform is uploading several files all at once.
You can manage content items in the same way you would manage your local files - for example, you may:
- Double-click on a file to edit it.
- Right-click on the item, to view or change properties on the file or folder.
- Drag and drop the object (either between Plone folders, or between Plone and your file-system.)
- Use Cut/Copy/Paste commands (either between Plone folders, or between Plone and your file-system.)
- You can create new content by selecting File > New (or right-clicking in a folder) and selecting the type of file you wish to create from the menu.
Moving content around
(this applies to both Files and Plone documents).
You can manage your content in the same way you would manage your local files. For example, you may:
- Double-click on a file to edit it.
- Right-click on the item, to view or change properties on the file or folder.
- Drag and drop the object (either between Plone folders, or between Plone and your file-system.)
- Use Cut/Copy/Paste commands (either between Plone folders, or between Plone and your file-system.)
- Move/Copy multiple files into a Plone directory using Control-C, Control V.
- You can create new content by selecting File > New (or right-clicking in a folder) and selecting the type of file you wish to create from the menu.
Using File Templates
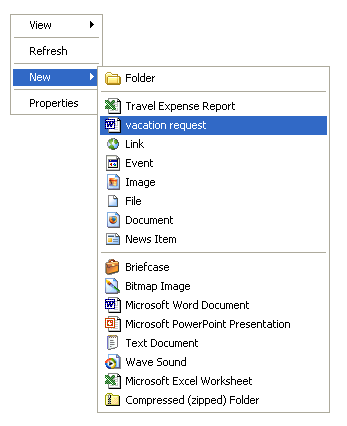
For sites run by Enfold Server, you may see an additional file type when you select Add in the right-click menu to add content.
Enfold Server supports File Templates, the ability to add a new file based on an existing Office template. (This is unavailable for general Plone installations). Your site administrator needs to configure this separately. For the most part, you will add and edit these Office templates as you would other file types in Enfold Desktop. In the screenshot below, Travel Expense Report and Vacation Request are file templates (a feature available only on Enfold Server, a commercial server product.
For more information about this feature on Enfold Server, check http://www.enfoldsystems.com/software/server/docs/4.0/desktop.html.