Adding Sessions
What is a Session?
(See also: Introduction to Enfold Desktop and a 5 Minute Tutorial ).
The first thing to do after installing Enfold Desktop is to add a session.
A session is a connection to a Plone site. Once you successfully create a session, you will be able to view the website just as if it were a folder in Windows Explorer.
More:
- It is not necessary to "connect" to a session; once a successful session has been established, it will persist until you delete it. If the connect status says "Disconnected," that may merely mean that you haven't actually tried to browse through the Plone site by double clicking on the session name.
- Deleting a session does not remove anything on the server. It merely cuts the continuous connection of Enfold Desktop with the Plone site.
- You can set up several sessions, but each session must use a different URL. For example, one session could go to www.mydomain.com and another could go to www.mydomain.com/accounting.
- Sometimes, if the network is down, the session will be unavailable, but the session will be available after this is fixed. (You may need to double-click on the session again to reestablish the connection).
- If you need to reinstall or upgrade Enfold Desktop, session information will be preserved.
- Creating multiple sessions are a convenient way to store logins and even serve as shortcuts for complicated paths
Requirements: To create a session, you must already have your username, password and URL of the Plone site you wish to connect to with Enfold Desktop.
Two Ways to Add a Session
Method 1: Create a Session using the right-click menu in Windows Explorer
This is the preferred method for creating an Enfold Desktop session.
-
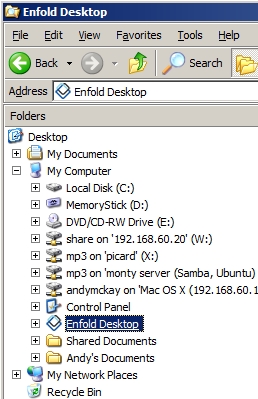
Go to: Start > Programs > Enfold Desktop. When you do this, Windows Explorer will open, and in the left panel, you will see the Enfold Desktop icon highlighted in gray. (You will also see a directory called Local and perhaps a directory called Demo underneath that.
-
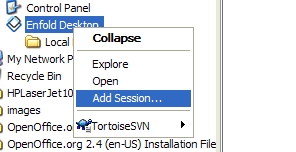
Right-click this Enfold Desktop icon. Select the right-click option to Add Session.
-
At this point you will be prompted for additional information.
-
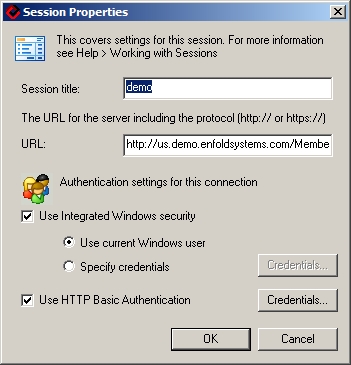
Session Title: You can create any name you want here. Tip: To avoid confusion, include the user name and domain or folder name in your session title. (Example: jsmith on plonesite1).
-
URL: this identifies which of the Plone folders will be the topmost folder in Enfold Desktop. Most commonly, you will use Plone root (Example: http://www.mydomain.com)
-
Authentication Information. Here is where you provide your user name and password.
-
Use Windows Security Integration. This is needed when your Plone site uses Single Sign On with Enfold Server. Even if your Plone site doesn't have these features, you can still keep this checked. Enfold Desktop will try HTTP Basic Authentication if it fails. However if you know one or the other is being used exclusively on your site, then you can uncheck the appropriate option.
- For example when connecting to us.demo.enfoldsystems.com, you can uncheck "Use Integrated Windows security" because you will be using HTTP Basic Authentication. That is common for many websites.
- If you'd like to change your user name and password then click on Credentials and enter a new user name and password.
-
HTTP Basic Authentication. When you click the Credentials button, you will be prompted for your username and password. If your Plone site has turned on Windows Security Integration you will be logged on automatically through NTLM.
-
A few things to remember about the username and passwords:
- Username and passwords are both case sensitive.
- The username is your Plone (i.e., Enfold Server) username, not the Windows one unless you are using Windows Security.
- This password is stored on your Enfold Desktop computer's file system.
After you fill out the fields, the icon corresponding to your session will read "Disconnected". To activate the session, click twice on this icon. After you do this, you will be able to browse the Plone site as though it were simply a series of files and directories on the Plone site.
Security & check in conflicts
Enfold Desktop communicates with the Plone site using the same security settings as the web browser. It uses the username and password that you would type into an Enfold Server site.
If you are using Integrated Windows security (also known as single-sign on or NTLM) then your user name will automatically be communicated to the server. Contact your system administrator to troubleshoot that.
If you are not using NTLM, then your Plone site will be able to reset your password via email. If you forget or if your login information does not work, go to the Plone site and check the link Forgot your password?
Method 2: Clicking the View in Desktop Option
Another method to create a session is simply by clicking the View in Enfold Desktop link at the bottom of a web page. (This will appear on the bottom of each page, but in some cases, the System Administrators will hide it or remove it).
Clicking the View in Desktop option can create a new session if you haven't created one before, but it is more useful for reestablishing a session you previously used.
See Starting an Edit Session from your web browser.
For most people who work with only a single Plone account, this will not be a problem, but if you are switching between different accounts on the same website, it's better to use the first method in order to avoid mix-ups.
Changing the Root for Sessions
If you create a session from Windows Explorer, you have the ability to modify the URL which will be the root. You can edit this at any time.
There are global options which the System Administrator can set to change the folder which is considered to be root when you press the View in Desktop link on a web page. But generally, it is easier for individual users to create sessions with different URLs.
Sometimes your site administrator will set up virtual folders so that when you click this link, a URL other than root will appear. For more information, see Making Custom Sessions in Enfold Desktop http://www.enfoldsystems.com/software/server/docs/4.0/desktop.html