Editing Documents
Before you can edit documents, you need to be sure that your preferred editor will open when you edit an HTML document and that the Server component is installed on your Plone server.
Editing HTML in Desktop: Caveats
When you edit a Plone document or html file within Enfold Desktop, it's important to understand what is going on.
Enfold Desktop is using Web Dav protocols to sync local content with remote content. (Read more about WebDav on Wikipedia http://en.wikipedia.org/wiki/WebDAV ).
With Plone, there is one more "complicating factor." If you added a typical html file to a Plone folder using Desktop's drag-and-drop feature, the html page will not render exactly as is; on the Plone site, this html will be presented with a Plone skin (i.e. template). This Plone skin will include cascading style sheets (.css files) which will determine the final presentation of the html code.
Plone's default behavior is to strip out certain HTML elements from the Plone document and render it using Plone's template and style sheets. Here are some things you may notice:
- Most of the tags lying above the <body> tag (i.e., <html>, <head>, <body>) will be stripped out. The Plone Administrator can tweak which HTML elements the user can insert into documents by going to Plone Site Setup --> HTML Filtering. Among the Kupu configuration options (Plone Site Setup --> Visual Editor), there is an option to Filter HTML in source view.
- When Enfold Desktop opens up a Plone document/page for editing, the editor will show a fragment of the entire HTML page. Desktop will ignore the general site template and just expose you to the HTML fragment which is editable. Similarly, if you create a new HTML document with Desktop, Plone will strip HTML elements according to its HTML Filtering rules.
- If you are using Enfold Desktop to create an html file (i.e., Plone Document) from scratch, it's not necessary to have a valid HTML document which can stand alone on its own (although it won't hurt). Instead, the file can just be a HTML fragment containing content which would normally be contained within an html BODY tag.
- Scripts. Even if they are included in the HEAD section, scripts will be deactivated.
- CSS: inline styles will be rendered normally. However, references in the link section of the HEAD to a separate css page will be rendered inoperative.
If you are dragging-and-dropping html files into a Plone folder with Enfold Desktop (or within Kupu, for that matter), you should try to keep the document structure simple and not use embedded scripts or layout elements which break out of the site's overall design.
Kupu or Enfold Desktop: which to use?
Sometimes using Enfold Desktop to edit Plone items is not the easiest or best method. In many situations, using Kupu (the default online editor preinstalled with Plone) is the superior alternative. Some things to keep in mind:
- If your Plone page will contain links to images and other pages on your Plone site, use Kupu. Kupu lets you browse/search for other resources on the Plone site. In Enfold Desktop, you would need to hard code the URL's manually.
- If you need a more wysiwig feel when making a web page, then use Kupu.
- If you need to move multiple files into a Plone folder, use Enfold Desktop.
- If you need to browse through several folders while looking for something, use Enfold Desktop.
- If you need to rearrange the organization of your site, use Enfold Desktop.
- If you wish to add/edit a content type other than the built in Plone types, use Kupu.
- If an item requires a lot of time to edit and you wish to keep it open and lock it, use Enfold Desktop.
- If you need the ability to quickly view the publication state of all items in a Plone folder and the ability to edit standard metadata, use Enfold Desktop.
- If you have an Administrator account and wish to be able to quickly share documents with different users and groups, use Enfold Desktop. (An Administrator account is one with access to Plone Site Setup).
- If you are administrator and want a quick way to view settings in the ZMI, use Enfold Desktop. (Note: other than viewing files, editing the ZMI with Enfold Desktop is not recommended).
Add & edit a new item in Desktop
(See also: 5 minute quick tutorial. If you visit http://www.enfoldsystems.com/assets/demos/create-a-collection.swf, you can view a 2 minute animated screencast about editing in Enfold Desktop).
Once you start your Enfold Desktop session, you can navigate through the Plone site as though it were a series of directories on your file system.
Assuming that your user account has proper permissions, you can browse through these folders and even add new content.
Suppose you are in a Plone folder in Enfold Desktop where you have the ability to add content.
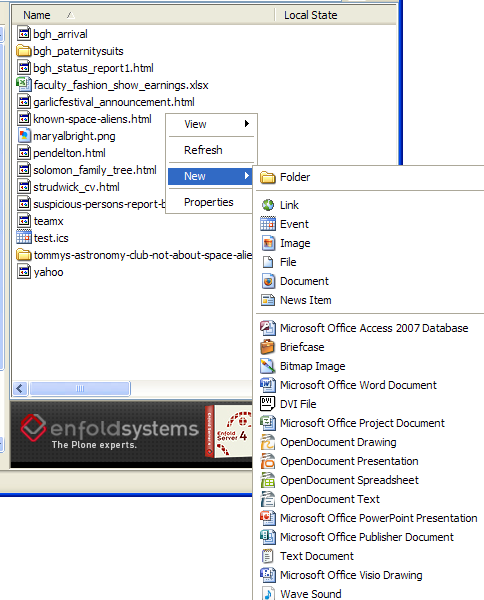
Let's look at the illustration above. This is what you see (more or less) inside a Plone folder when using Enfold Desktop.
This new menu is divided into three parts.
- The middle part consists of the default Plone types (and any File Templates you may have created). (Read more about File Templates and Enfold Server http://www.enfoldsystems.com/software/server/docs/4.0/desktop.html#using-file-templates ).
- The top part is a folder (a concept which is similar in both Plone and Windows).
- The bottom part consists of the file types which normally appear whenever you are in Windows Explorer.
For this example, we shall assume that you wish to create a Plone document.
- Choose New and the type of item you want. For this example, we shall assume you are creating a Plone document.
- Immediately right-click the file you have created and choose properties. Complete the Name, Title & Description fields as needed (Read guidelines for naming content items).
- Click Ok, and, with the right-click menu, select Edit.
- Your favorite application will open, allowing you to edit the Plone document. (Read Setting up your editor with Enfold Desktop).
- Save your file.
- Check in your file by choosing the Check In right-click option. (Read how to check in a file).
- (Optional) To view in browser, right-click on the file and select View in Browser.
- (Optional) To publish/submit for publication/change status, right-click on the file and select State: Publish.
Edit existing content in Desktop
With Enfold Desktop you can edit any built in content type, as long as it isn't locked by another user. (Read Enfold Desktop and Plone locks). These content items may lack the file extensions you normally associate with these types. (For example an html file no longer needs to end in .html). (See Handling File Names and Titles).
If you are at a File download page on the Plone site, when you click the View in Enfold Desktop, the application to edit the File will open up. (See Uploading & Managing Files in Enfold Desktop).
Note: Content types other than the built-in ones which come with Plone (i.e., from third party products) will not be editable or even visible in Enfold Desktop.
Steps for editing an item are similar to those mentioned above.
- With the right-click menu, select Edit.
- Your favorite application will open, allowing you to edit the Plone document. (Read Setting up your editor with Enfold Desktop).
- Save your file.
- Check in your file by choosing the Check In right-click option. (Read how to check in a file).
- (Optional) To view in browser, right-click on the file and select View in Browser.
- (Optional) To publish/submit for publication/change status, right-click on the file and select State: Publish.
Starting an edit session from your browser
After your System Administrator installs the Server Component on your Plone site, you may notice a link on the bottom of almost every page. (Note: you will not see it unless you are logged on to the website).
The link will say "Edit using Enfold Desktop."

- Click on this link on the web page.
- You will briefly see a free-floating bubble indicating that Enfold Desktop is starting
- You will be prompted for user name and password. (If you have not previously set up a session for this website, one will be created for you using this login information).
- An application will open for editing this document.
- Edit the document as you wish and Save.
- Open File Explorer to the directory that says Enfold Desktop and browse to the directory containing the file you just finished editing. (You may need to go back to the browser and look at the URL if you don't remember the exact URL path).
- When you open up the correct directory, your file will have a green + icon. Right-click and choose check in.
Notes:
- This link might not appear if your system administrator disabled it. (See Removing the Desktop link on Plone pages).
- By default, if you haven't already created a session, Enfold Desktop will create one using the top domain.
- It is possible for sys admins to configure custom sessions so that the URL for new sessions will correspond not to root but to a subdirectory. (See Configuring Custom Sessions with the Server Component).
Moving or Copying Files into a Plone folder
(also called the drag-and-drop method).
In this method, you edit an html/txt file in a separate editor first and then move it into the corresponding Plone folder when you are done.
This usually involves three steps:
- Produce the document/file in any location.
- Copy/Move the document(s), and then navigate to the right Plone folder in Enfold Desktop.
- Right click and Paste. The files will copy into this directory and overwrite files with the same name.
- Check in your file by choosing the Check In right-click option. (Read how to check in a file).
- (Optional) To view in browser, right-click on the file and select View in Browser.
- (Optional) To publish/submit for publication/change status, right-click on the file and select State: Publish.
Enfold Desktop or Zope External Editor: Which to Use?
Zope External Editor is useful for non-Windows platforms and doesn't require having to check in content items. (When you close the item in the editing application, Zope external editor will prompt you to ask whether you are really finished). If you plan to accomodate both editors on your site, you should read the instructions very carefully, installing Zope External Editor first and then Enfold Desktop. More information about the Zope External Editor is at http://www.enfoldsystems.com/software/server/docs/4.0/desktop.html#installing-zope-external-editor .