XDV Tutorial
XDV Tutorial
According to XDV documentation (at XDV documentation: http://pypi.python.org/pypi/xdv), XDV is "a way to apply a style/theme contained in a static HTML web page (usually with related CSS, JavaScript and image resources) to a dynamic website created using any server-side technology."
This tutorial will show how XDV can be implemented on your Plone site with the assistance of Internet Information Services (IIS) and Enfold Proxy. See also: XDV Reference and Using EP with XDV Themes for more advanced configurations.
Theme Setup
Here is a summary of the necessary steps:
- Create a directory on the Windows file system that will contain your XDV files. This can go underneath the root directory of one of your IIS websites or be entirely separate from it.
- Add some test XDV configuration files to this directory.
- With IIS configure a Virtual Directory which points to the directory with your XDV files.
- Open Enfold Proxy and select the proxy definition which will be themed with your XDV files.
- Go to the Excludes tab for this proxy definition and type the name of your IIS virtual directory in the Excludes regex field.
- Manually edit the eep.ini file (the EP configuration file found inside the Enfold Proxy install directory). You will add special instructions for the proxy definition which will use XDV.
- Test the web page in the browser to make sure the page uses the XDV theme.
Create a directory & add some XDV files
First we need to configure IIS to serve static resources for our XDV theme. This directory will contain our theme and its associated static resources, e.g., C:\xdv-theme and C:\xdv-theme\static respectively.
Create three empty files to get started: C:\xdv-theme\rules.xml, C:\xdv-theme\theme.html, and C:\xdv-theme\static\styles.css.
Configure a Virtual Directory in IIS
(These instructions are specific to IIS 6. The instructions are slightly different in IIS 7).
Suppose we want Default Web Site to be the site using XDV.
Launch the IIS Manager, right-click Default Web Site, and click:
New -> Virtual Directory
You will see the virtual directory creation wizard. Click the next button.
Select an alias, (such as "static") and click the next button.
At this point you will need to browse to the directory corresponding to where you put the XDV files (in our case, C:\xdv-theme\static. Click Next and then finish.
Configure your EP Proxy Definition to work with XDV
Launch the Enfold Proxy configuration utility and select the proxy definition/IIS site that you wish to theme. Select Excludes. You can either select All in the Auto-excludes field or type the name of the alias you used (in this case, static) into the Excludes regex field. Click Save and exit Enfold Proxy configuration tool.
Now in your browser, you should able see the CSS file from the static folder:
http://localhost/static/style.css
Manually edit the eep.ini file with references to your XDV files
Now we're ready to create an XDV theme. Open up the C:\Program Files\Enfold Proxy\eep.ini file in your favorite text editor. At the end of file, add following text:
[xdv default]
rules = C:\xdv-theme\rules.xml
theme = C:\xdv-theme\theme.html
You can also add these lines to enable more verbose logging. This is helpful for debugging problems with your XDV theme. But don't forget to turn verbose logging off.:
[xslt]
level = DEBUG
Now find your proxy definition and add these lines. For example:
[host default]
vh_hosts=....
....
themes = default
xslt_enabled = true
(In this case, the proxy definition being referenced here
Create the Theme HTML and Rules Files
Open the C:\xdv-theme\theme.html file in your favorite text editor, and modify it to look like:
<html>
  <head>
    <title>XDV Example</title>
  </head>
  <body>
    <h1>The simplest possible example of an XDV transform.</h1>
    <p id="my-content-area">This body text will be replaced.</p>
  </body>
</html>
Open the C:\xdv-theme\rules.xml file in your favorite text editor, and modify it to look like:
<rules xmlns="http://namespaces.plone.org/xdv">

  <!-- Copy over the contents of the page body -->
  <replace content='//\*[@id="content"]' theme='//\*[@id="my-content-area"]' />

</rules>
Believe it or not, that's a complete (but very basic) Plone theme using XDV. We now have an HTML file which serves as the base of our design, as well as a rules file that does the transform.
Test that Everything Works
Point your browser to http://localhost/. Admire your beautiful, unstyled HTML page. It should look like this
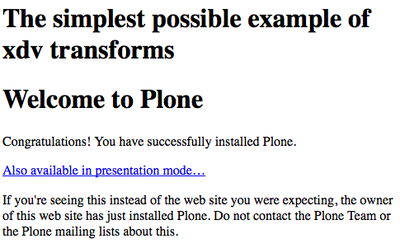
Not particularly visually exciting, is it? But what you have just set up is a very powerful way to theme Plone sites that makes it possible to use any pre-existing design with a Plone back-end. The reason that this is exciting is that you're using your own HTML and CSS, not modifying Plone's HTML and CSS.
How it Works
A high-level overview of what is going on in XDV.
The way XDV works is simple, but since it might take a little adjustment of the mental model that you're used to if you have done theming in Plone (or any other system), it's worth an explanation:
The main difference is that you're not touching the templates and HTML from Plone itself at all. Instead, you create the layout and design you want in standalone HTML and CSS files and map parts of the content that comes out of Plone into your existing HTML.
This means that you can create as complex (or simple!) designs as you want, and let Plone supply the content.
This also means that you can write your own from-scratch HTML and CSS, but also map various Plone elements to wherever you want in your own design. Plone knows nothing about what happens "on the way out", it just renders a page as it usually does.
A more visual way to look at it, here you can see how the Plone output is mapped into a totally different template and design:

This makes for a much more robust approach to theming, because as long as Plone keeps its HTML classes and IDs the same from one version to the next, your theme will automatically work even in a new version of Plone. And if it has changed, it's a relatively simple operation to update the theme - just locate the new name, and replace it in the rule file.
The Rule File
Central to the way that content makes its way from your Plone site into your theme is the rule file. Let's look at your simple rule file again:
<rules xmlns="http://namespaces.plone.org/xdv">
  <!-- Copy over the contents of the page body -->
  <replace content='//*[@id="content"]' theme='//*[@id="my-content-area"]' />
</rules>
Ignoring the preamble <rules> and the comment, there's one single instruction here:
<replace content='//*[@id="content"]' theme='//*[@id="my-content-area"]' />
So what does it do?
- It looks at the Plone side of things ("content"), and locates the part of the HTML that has id="content".
- It then replaces the part of your theme's HTML that has id="my-content-area" with the content it got from Plone.
The syntax (inside the content and theme attributes) can be a bit intimidating - luckily we have great tools to make it very easy to get this right. The syntax is called XPath, and is a standard for addressing nodes in the DOM, and it's also directly supported in Firebug. A full treatment of how Firebug works is out of scope for this tutorial, but the Firebug online documentation should explain how to install it and use it in Firefox.
The screenshot below illustrates what you see when you open Firebug when looking at Plone source code. Locate the content area as shown below, and right-click the node:

As you can see, there's a way to copy any HTML node, and get its XPath expression. When you paste what's now on your clipboard, you will see:
//*[@id="content"]
That is the XPath expression that uniquely identifies that part of the page. You probably recognize this from our original rules.xml file. That's the node that you're looking for in the Plone source, and you use the same approach to find the node you want to replace in your theme.html file.
You don't have to teach yourself XPath - just arm yourself with Firebug, and make use of its built-in support for these expressions.
XDV Rules overview
Four rules are all you need to theme a site. Luckily, what goes in a rule file is simple - there are only four types of rules, and they are easy to understand.
The rules are:
- replace
- append/prepend
- copy
- drop
<replace>
Replaces an element in the theme with content from the site.
Real-world examples:
A useful thing to do is to carry over the <title> and <base> tags from Plone, so the theme will have the right page titles and work correctly when you do operations on folders:
<replace content='/html/head/title' theme='/html/head/title' />

<replace content='/html/head/base' theme='/html/head/base' />
The XPath expressions are actually pretty straightforward when you know exactly where the elements are. You'll get used to the most common variations after using Firebug's Copy XPath a few times.
Also note how the entire specified tag is replaced, nothing from the theme file remains.
Another common example is making the content of a page from Plone appear in the theme:
<replace content='//*[@id="content"]' theme='//*[@id="my-content"]' />
<append> & <prepend>
Adds the content from the site to the theme, either before or after the specified element.
Real-world examples:
Adding the Plone-created CSS and JS in addition to the ones already in the theme:
<append content='/html/head/style' theme='/html/head' />

<append content='/html/head/script' theme='/html/head' />
Notice how we take the all of the <script> and <style> tags from Plone, and append them after the current content of the head tag in the theme. This way, you can let Plone manage some of your CSS and JS if you want - useful for conditional includes.
Another examples is carrying over the id and class attributes on the body tag, since these are useful for styling on a per-page basis, and the visual editor uses them too:
<prepend content="/html/body/@class" theme="/html/body" />

<prepend content="/html/body/@id" theme="/html/body"  />
This final example illustrates the <append> usage. Imagine that we only have one sidebar, but have two columns in the Plone site that we both want to appear inside the sidebar:
<append content='//*[@id="portal-column-one"]/div' theme='//*[@id="sidebar"]' />

<append content='//*[@id="portal-column-two"]/div' theme='//*[@id="sidebar"]' />
This way, the second rule doesn't overwrite the first - it appends the second column, so both appear inside the id="sidebar" node.
<copy>
Copies HTML nodes from the Plone side of things and inserts it inside a tag on the theme side:
<copy content='//*[@id="portal-globalnav"]/li' theme='//*[@id="main-nav"]' />
Notice how this one gets every <li> element inside the node with id="portal-globalnav" in Plone, and makes a copy inside the node that has id="main-nav" in the theme.
<drop>
Removes the specified element if it exists. This one is a bit different than the others, since it only has a content=value - since it only makes sense to drop an element from the Plone side.
Real-world example:
Getting rid of the icon inside the user-name node:
<drop content='//*[@id="user-name"]/img' />
Since there is no ID directly on this image, we just drop any <img> inside the user-name ID.
That's actually everything you need to know, now the next steps are up to you!
Advanced options: Using xincludes and conditional rules
The XDV Reference contains code examples for breaking up a rules file into multiple files with xincludes(for the purpose of reuse) and using conditional statements in rules files. See Using EP with XDV Themes for examples of more complex configurations such as selecting themes based on URL or HTTP headers.
Attribution
Portions of this documentation were authored by Alexander Limi (Theming with collective.xdv) and Denys Mishunov (Advanced XDV theming).