Managing Multiple Hosts
Managing Multiple Hosts
Managing Multiple Hosts
Enfold Proxy (EP) can also be used to map more than one Plone sites to different domains or hosts.
Both Internet Information Services 6(IIS) and IIS 7 allow you to create multiple IIS sites.
Having problems? Check the troubleshooting checklist or the common tasks in Enfold Proxy or the FAQ.
One necessary step in configuring a proxy definition is selecting an IIS site to associate with.

After IIS is installed, there is usually one website already created for you called Default Web Site. The name is not important (you can edit it within IIS). This name will appear as a dropdown option on the Site tab for a proxy definition. As a general rule, each proxy definition requires one unique IIS site to be associated with it. The topic below covers how to create additional IIS sites so Enfold Proxy can list them as a dropdown option.
(Technically speaking, a proxy definition is creating an association with the unique identifier ID of a particular IIS site, not the site name itself. This ID is a numerical value. You can see this unique identifier ID from the eep.ini file located in the Enfold Proxy directory and from the IIS management console. Read more about unique identifier IDs and how to confirm that Enfold Proxy is reading them correctly --near the bottom).
Creating a Second Internet Host and Proxy Definition
For this example, http://www.originalsite.com is the first domain, and http://www.funsite1.com is the second domain you will use.
-
Configure your first IIS host in the normal way. See Configuring your first IIS host.
-
Verify that the first host resolves correctly (See Verifying that the IIS Host resolves correctly)
-
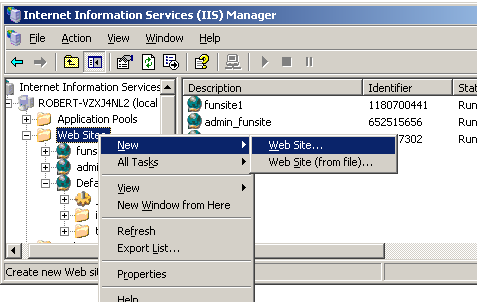
Use IIS to create a new IIS site. Right-click on Web Sites within the IIS Manager and select New --> Web Site. (If using IIS 7, right-click Sites and select Add Web Site).
-
Go through the IIS Site Creation wizard. In this example, the new site will be called funsite1 . Notes:
- you will need to indicate a directory for the site root. You can simply use the default site root for IIS ( C:\Inetpub\wwwroot ) or create one underneath this directory (i.e., C:\Inetpub\wwwroot ). The most important thing here is that the directory allows read access for the IIS user.
- Enter: Port Number: 80, Host Header values: www.funsite1.com, IP Address: All Unassigned, and leave "allow anonymous access" enabled.
-
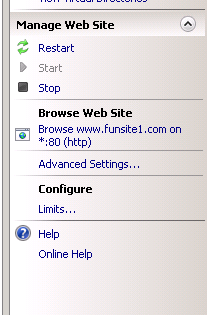
Restart the Web Site. (You will not need to restart IIS itself).
-
In IIS 6 right-click the site name (funsite1) in the IIS Manager and choose Start or Restart.
-
In IIS 7 the Start/Restart option is located on the right panel in the IIS Manager. Highlight the funsite1 site in the middle panel and select the Start/Restart option.
-
-
Test that your domain works in IIS. (See Verifying that the IIS Host resolves correctly)
-
Create a new Plone site using the ZMI. (See Adding a Plone site with the ZMI). You will need to give the new site a different name besides "Plone". For this example, we'll call the Plone site Plone2.
-
Now configure your proxy definition for the www.funsite1.com similar to how you did it in Step 1.
- Change the Virtual Host Root to correspond to your Plone site. (Use /Plone2 or whatever you want -- remember the initial backslash is necessary here).
- Go to the Site tab and click on the dropdown menu. Choose funsite1.
-
After you press Save, you can test the URL in your browser to make sure it works.
checklist.html#id2