Adding a Proxy Definition
Adding a Proxy Definition
When and why should you add a Proxy Definition?
Within the contexts of websites, a host generically refers to a URL resolvable within a browser. That can mean a web domain (i.e., www.originalfunsite.com) or simply the name of a private computer host (http://thirdrock ).
In a Windows web server environment, hosts are usually configurable within Internet Information Server (see below).
A proxy definition is a set of instructions specific about how Enfold Proxy should proxy (or redirect or cache) http requests from one IIS host. Generally, with one important exception (see Multiple Domains with only one IIS site), you declare your hosts in IIS and use "proxy definitions" to connect these hosts with Plone sites on Enfold Server.
Enfold Proxy originally arose out of the need to simplify the URL mapping process within Plone in a Windows environment. However, because Enfold Proxy is essentially a plugin for IIS, you can use Proxy Definitions to wrap a non-Plone site into a Plone site and vice-versa. That makes it easy to integrate a java application or Django application together with a Plone site together under the same domain.
For instance you could use EP to set up these mappings:
www.funsite1.com (and recursive URL web directories) could be used to serve Plone content. www.funsite1.com/payroll could be used to serve a java servlet you added inside IIS. www.funsite1.com/media/ could be used to serve videos (from a media server you added to IIS).
When should you NOT create a proxy definition? Exactly one proxy definition should correspond to one IIS site. You should not need a second proxy definition to point to the same IIS site.
Having problems? Check the troubleshooting checklist or the common tasks in Enfold Proxy or the FAQ.
For this example we will create a simple proxy definition: use Enfold Proxy to map a Plone site to the host http://www.originalfunsite.com
Creating a Proxy Definition for your IIS Host
After you have verified that your host or domain resolves correctly within a browser, you can now add a proxy definition to link this host to a Plone site.
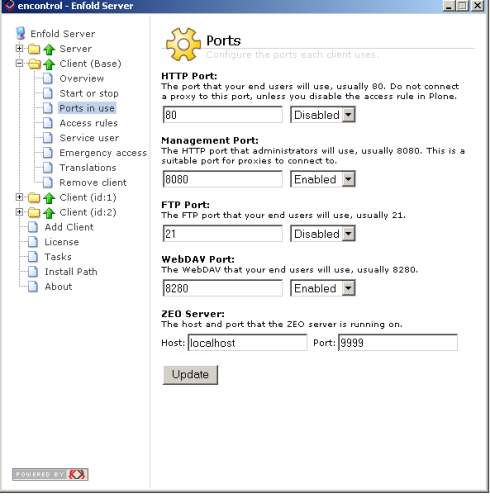
- Open the Enfold Server Configuration Utility to do this. (Start --> All Programs --> Enfold Server --> Enfold Server Configuration Utility). Modify/write down the management port number for this Zope client. (Note: Each Zope client must have a unique management port number. If not, then the Check Utility will show an error).
- Disable the HTTP port (usually port 80) for the Zope client. Your ultimate goal is for Enfold Proxy to listen to port 80 requests to this IIS site and to communicate with the Zope client via port 8080. Here is a screenshot of typical settings for your Zope client in Enfold Server.
- Restart any Zope client(s) you have modified by choosing the Start|Stop option on the left panel.
- Open the EP Configuration Tool. Click the folder on the left panel Proxies. Choose Add a Proxy Definition . Give your proxy definition any name you want.
- Adjust the basic settings if necessary. By default, the new host comes with the most common defaults:
 Local host= /
Virtual host root = /Plone
These settings will cause the root (/) of your URL to go to the Plone site automatically created within your Zope client. The Plone site object should be visible inside the Zope Management Interface (ZMI). Change these values when necessary. You can verify the value for Virtual host root by logging into the ZMI application root and verifying that a folder corresponds to this value already exists. For more, see Using the ZMI.
- Add the Virtual Host that corresponds to your management port of your Zope client. The virtual host can be an IP address or a resolvable host. Examples: 127.0.0.1:8080, 192.168.1.150:8080, localhost:8080
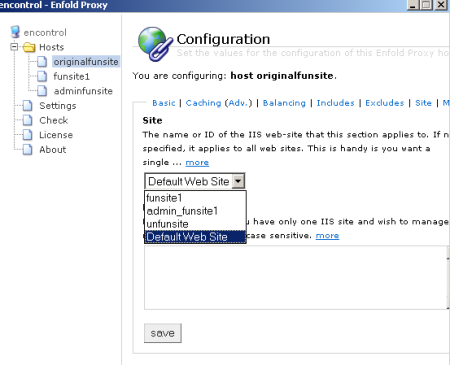
- In your Proxy Definition, select the Site tab on the top. When you come to that screen, you will see a dropdown screen for the Site screen. Choose the IIS site which is serving the host/domain you will be using. For this, we shall use Default Web Site (which uses the www.originalfunsite.com host headers).
If the result is not what you expect, run Check Utility to troubleshoot. Also, see the Troubleshooting Checklist.
Deleting a EP Host
If you become stuck or wish to start from scratch, you can start over by deleting the host sections by using the GUI. Before you do so, you might wish to save a backup copy of your settings. Your settings are stored in the eep.ini file
It is usually not necessary to restart Zope or IIS when you do this, but when testing, make sure to clear your browser cache.
Backing Up and Restoring Your Proxy Definitions
Because your EP configurations are stored in the eep.ini file, you can backup those settings by copying the file to a safe place.
Although the eep.ini file has easy-to-read syntax, it probably is easier to make configuration changes through the GUI interface. See Configuring EP Manually for a discussion of the pros and cons of editing the configuration file manually.